

From my own hosting days, I’ve learned that easy Italian sliders are a smart win for parties and big crowds because they are easy to make, taste good, and feel perfect for an easy dinner or quick appetizer, especially during holiday parties when time is tight; I enjoy making them with layers of provolone cheese, salami, pepperoni, ham, and mozzarella cheese, then adding red onions and banana peppers for balance, which always turns out good when served warm with marinara sauce on the side for dipping, giving guests bold flavor without stress.
Why Italian Sliders Are the Ultimate Party Appetizer
I have hosted many game nights and family get-togethers, and every time I bring Italian sliders, the tray comes back empty. Starting with potluck. sliders just makes sense because they are easy to share, quick to grab, and loved by everyone. What makes them special is how a soft the italian. roll holds bold flavors without falling apart, turning a simple slider into one of those appetizers people remember and ask about later, and from my experience as someone who loves testing party food ideas, this balance of taste, size, and convenience is exactly why they work so well for any crowd.
What Makes Italian-Style Sliders So Popular
From years of hosting game nights and family gatherings, I have seen how one small slider can solve big party problems, because these appetizers are easy to hold, quick to serve, and packed with bold flavor that feels familiar yet special; the magic often starts with the italian. roll, which stays soft inside while holding meats, cheese, and seasoning without falling apart, making it perfect for busy tables and standing guests, and when you bring them to a shared meal, potluck. sliders disappear fast since they travel well, reheat evenly, and let everyone enjoy a full Italian taste in just a few bites, which is why I keep coming back to them whenever I want food that feels generous, simple, and made for sharing.
Perfect Occasions to Serve Italian Sliders
From my years of hosting game nights and family get-togethers, I have learned that Italian sliders shine most when people want easy, shareable food, because one slider feels filling but never heavy, which is why they work so well as appetizers at birthdays, casual dinners, and office events; they travel well, stay soft thanks to the italian. roll, and fit right into buffet tables where guests keep coming back for more, especially at a potluck. sliders setup where variety matters, and I always notice how these sliders disappear first since they balance bold flavor with simple serving, making them perfect for relaxed parties where everyone eats, chats, and moves around without plates piling up.
Ingredients That Create Authentic Italian Slider Flavor
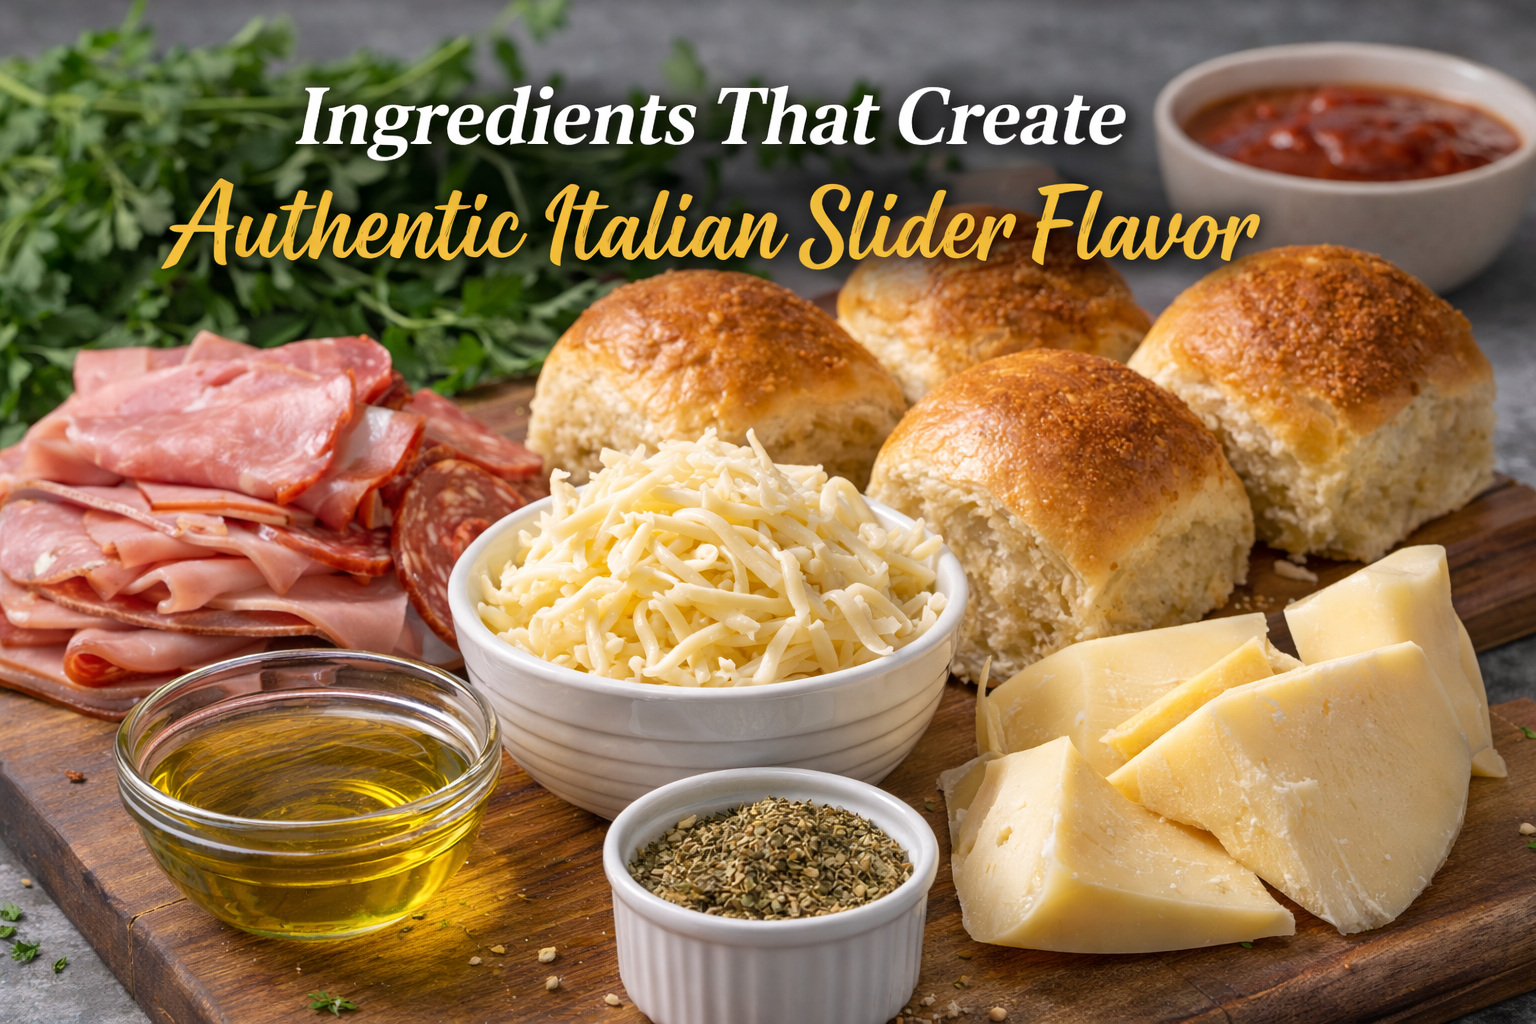
When I build sliders at home for family nights, I focus on balance, not overload, and that’s where 12 count King’s Hawaiian Original Sweet Rolls shine by adding gentle sweetness that supports savory layers like Pepperoni, Salami, and Ham without fighting them. I always mix 4 TBSP of butter with 1/2 each tsp Italian season and garlic powder to brush on top, because that aroma is what hits first in the oven. Inside, I stack Provolone cheese, Mozzarella cheese slices, and a light sprinkle of Parmesan cheese for depth, then cut through the richness with 1/2 cup banana pepper rings and 1/2 a red onion, sliced. The result feels authentic and comforting, especially when served warm with Marinara (for dipping), which, in my experience, turns simple sliders into something people remember and ask for again.
Choosing the Right Bread, Meat, and Cheese
From my own kitchen trials, real Italian slider flavor starts when soft sweetness meets bold savory layers, so I always begin with 12 count King’s Hawaiian Original Sweet Rolls as the base, then stack character through meats like Pepperoni, Salami, and Ham, which bring a balanced mix of spice, salt, and richness, followed by creamy melts of Provolone cheese and Mozzarella cheese slices to keep every bite smooth and stretchy; to brighten the richness, I add 1/2 cup banana pepper rings and 1/2 a red onion, sliced, then brush the tops with 4 TBSP of butter mixed with 1/2 each tsp Italian season and garlic powder for aroma, finishing with a light sprinkle of Parmesan cheese that crisps in the oven, and when serving, I always keep Marinara (for dipping) nearby because that warm, tangy dip pulls all these classic Italian notes together in one satisfying slider experience.
Why Provolone Is the Go-To Cheese for Sliders
From years of making sliders for family nights, I always start with Provolone cheese because it melts smoothly and adds a bold Italian bite that ties everything together when layered on 12 count King’s Hawaiian Original Sweet Rolls, and I balance that richness with Pepperoni, Salami, and Ham for depth, plus 1/2 cup banana pepper rings and 1/2 a red onion, sliced for a sharp, fresh contrast; sometimes I mix in Mozzarella cheese slices for extra stretch, brush the tops with 4 TBSP of butter blended with 1/2 each tsp Italian season and garlic powder, then finish with Parmesan cheese for a savory crust, and when served warm with Marinara (for dipping), every bite feels like an authentic Italian deli experience made at home.
How to Make Easy Italian Sliders Step by Step
In this recipe, I always start with prepping smart because these sliders are perfect for a Holiday party or any get-together, and my family always likes them this way: slice King’s Hawaiian Original Sweet Rolls in half, place the bottom of the rolls on a greased sheet pan, then layer the meat by adding pepperoni, salami, and ham in one layer or two layers, using as much or as little as you want, then add provolone cheese, mozzarella cheese, about 6 slices, plus banana pepper rings, pepperoncini, and peppers with 1/2 cup sliced red onion for heat, spice, or a more mild bite, making sure the tops are ready before waiting too long so they don’t get soggy; if you want to make this ahead of time, I suggest stopping here, then right before baking, mix together a butter mixture with melted butter, 4 tbsp, Italian seasoning, garlic powder, 1/2 tsp, brush it over the tops of the rolls, ensure even coverage, then bake in the oven at 350 degrees F for 10-15 minutes until the cheese is melted, which is exactly how I’ve learned to get consistent results every time.
Preparing the Rolls and Fillings
I start my prepping by taking King’s Hawaiian Original Sweet Rolls and using a sharp knife to slice them in half, then place the bottom of the rolls on a greased sheet pan, which makes a big difference when serving sliders for my family, because everyone likes clean layers and easy portions; I build one layer or two layers of meat depending on the crowd, using pepperoni, salami, and ham, adding as much or as little as you want, then I add provolone cheese, mozzarella cheese, exactly 6 slices, plus banana pepper rings, about 1/2 cup, some sliced red onion, and pepperoncini peppers for heat and spice, which still stays mild and balanced; once filled, I set the tops aside and, from experience, I suggest not waiting too long to finish, so I mix together a butter mixture with melted butter, 4 tbsp, Italian seasoning, garlic powder, 1/2 tsp, then brush it over the tops of the rolls right before baking to ensure they are not soggy; finally, I bake in the oven at 350 degrees F for 10-15 minutes, until the cheese is fully melted, which makes this recipe perfect to make ahead of time for a Holiday party or any get-together, especially when timing matters and you want reliable results without stress.
Pan-Fried vs Baked Sliders: Which Is Better?
From my own prepping routine, I always choose baking because it is simple, clean, and perfect when making sliders for a family crowd who likes comfort food, especially for a Holiday party or casual get-together, and this recipe also works great ahead of time when you don’t want guests waiting. Start by taking King’s Hawaiian Original Sweet Rolls, slice them in half, place the bottom of the rolls on a greased sheet pan, then layer the fillings using one layer or two layers depending on as much or as little meat you prefer, starting with provolone cheese, then pepperoni, salami, and ham, followed by add banana pepper rings, 1/2 cup sliced red onion, pepperoncini, and other peppers to balance heat, spice, or keep it mild, then finish with mozzarella cheese using 6 slices before setting the tops aside. To avoid soggy bread, I always suggest you mix together a butter mixture of melted butter, 4 tbsp Italian seasoning, garlic powder, and 1/2 tsp, then brush it on the tops of the rolls right before bake time, which helps ensure the cheese gets perfectly melted while staying crisp in the oven at 350 degrees F for 10-15 minutes, making baked sliders far better than pan-frying for even cooking and easy cleanup.
Popular Italian Slider Variations to Try

When I first started making sliders at home for family nights, I learned that variety is what makes them exciting, and Italian-style sliders are perfect for this. From my experience, mixing flavors like Ham and Swiss Sliders for a mild, cheesy bite, Roast Beef Italian Sliders for a richer and heartier taste, Meatball Italian Sliders for that classic Italian comfort, and Buffalo Chicken Sliders for a spicy twist keeps everyone happy at the table. These options show how small sandwiches can deliver big flavor, and by shuffling ingredients, sauces, and textures, you can turn simple sliders into something memorable without much effort.
Classic Ham and Provolone Sliders
For a familiar taste with an Italian twist, I lean on the idea behind Ham and Swiss Sliders, but I often swap Swiss for provolone for a deeper bite. The ham stays salty and soft, while the cheese melts smoothly into the bread. From my experience, brushing the tops with butter and herbs makes these sliders taste bakery-fresh.
Ham and Mozzarella Slider Options
When I make Italian sliders at home, I like to begin with Ham and Swiss Sliders, but I give them an Italian twist by swapping Swiss for fresh mozzarella and adding olive oil and herbs for extra flavor; this simple base makes it easy to explore bolder ideas like Roast Beef Italian Sliders with peppers and provolone, Meatball Italian Sliders with rich tomato sauce, or even Buffalo Chicken Sliders when I want heat and crunch, and from my experience, keeping the bread soft, the fillings balanced, and the flavors layered helps every slider feel unique while still fitting perfectly into the Italian style.
Alternate Mozzarella Version You’ll Love
When I experiment at home with sliders, I like to think beyond the usual cheese and let texture and balance lead the way, and this Alternate Mozzarella Version You’ll Love does exactly that by pairing creamy melt with bold fillings inspired by Ham and Swiss Sliders, Roast Beef Italian Sliders, Meatball Italian Sliders, and Buffalo Chicken Sliders, all reimagined with an Italian twist; instead of relying on sharpness alone, I swap in a softer mozzarella style, add herbs, and layer flavors carefully so every bite feels lighter but still rich, which works great when you want variety on one tray, and from my catering experience, guests enjoy how this approach keeps the sliders juicy, easy to eat, and surprisingly memorable without feeling heavy or repetitive.
Italian Meat Combinations for Bold Flavor
From my years of cooking sliders at home and for small gatherings, I have learned that the right meat mix can completely change the experience, and that is why Meatball Italian Sliders always stand out with their rich sauce and soft texture that feel comforting and bold at the same time, while Roast Beef Italian Sliders bring a savory, deli-style bite that works great with Italian herbs and melted cheese, and for a surprising twist I often serve Ham and Swiss Sliders with a light Italian seasoning to balance the salt and creaminess, and when guests want heat and excitement, Buffalo Chicken Sliders add a spicy kick that still fits the Italian slider style when paired with simple bread and fresh flavors.
Serving Italian Sliders Like a Pro
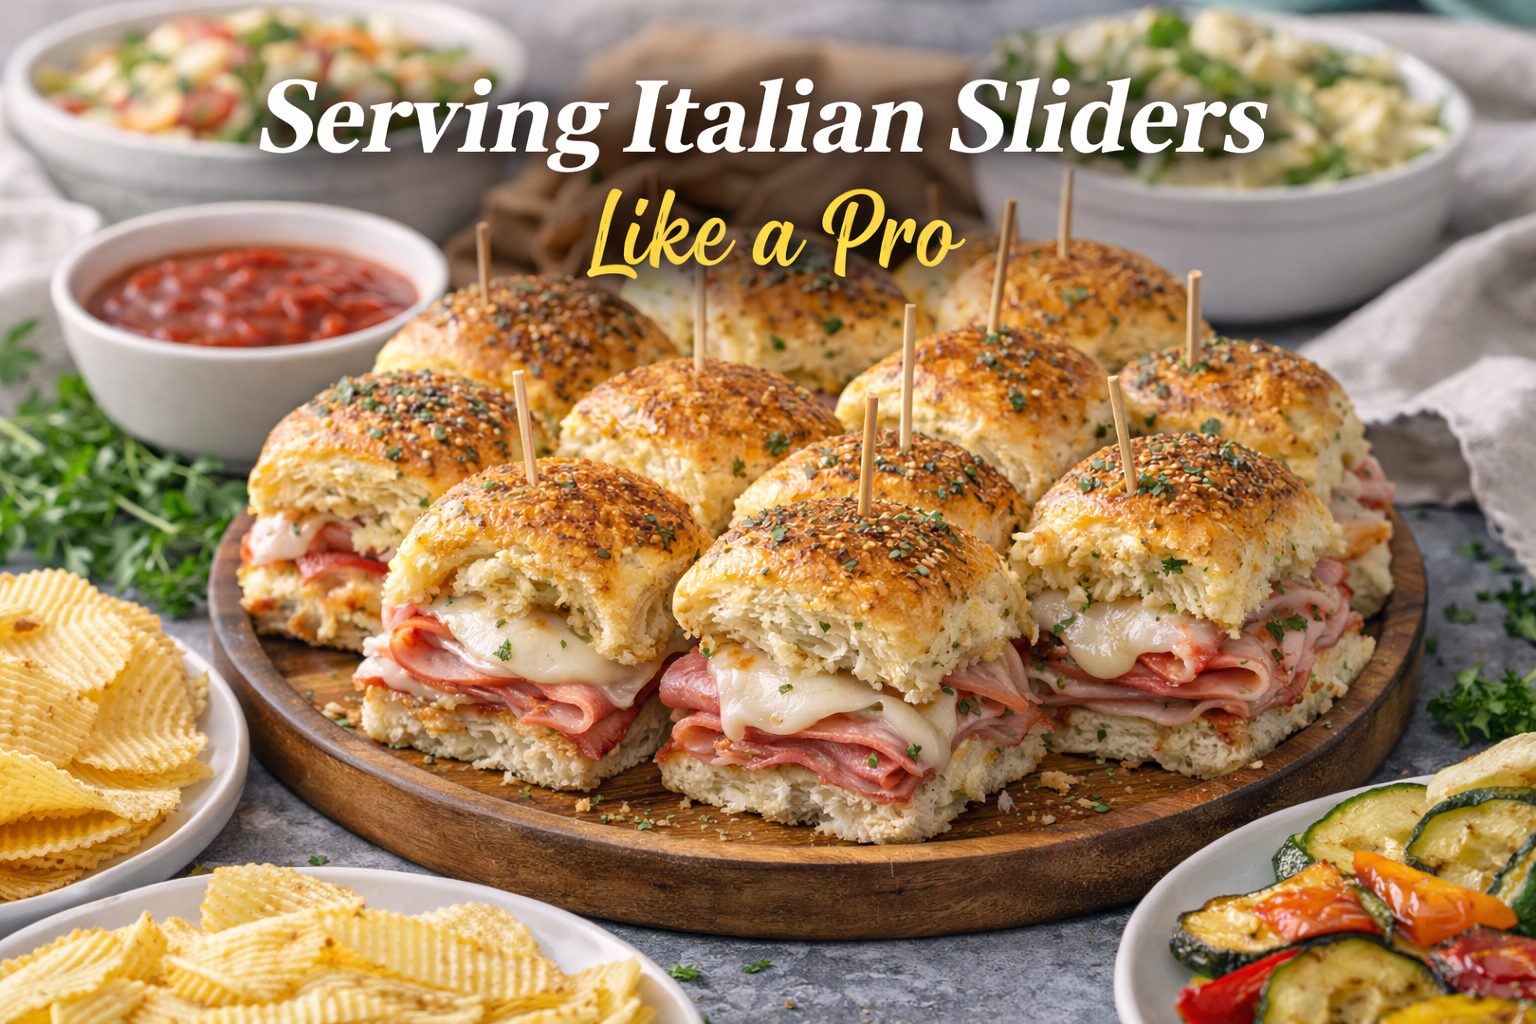
From my own kitchen time, I’ve learned that the real joy of sliders is how you serve them, not just how you make them, so I always focus on the top details first. I like when the tops turn nice and brown, with cheese fully melted, because that’s when people can’t wait to eat. A light sprinkle of Parmesan or extra Parmesan cheese on top adds a sharp bite, especially when these sliders are served warm with a dip of marinara. For balance, I pair them with a fresh salad, or something crispy like fries, potato wedges, or even a roasted veggie tray. When I’m short on time, the air fryer is good for quick sides, and it keeps everything feeling homemade. This setup helps everyone enjoy every bite without overthinking the plate.
Best Side Dishes to Serve with Ham Sliders
From my kitchen experience, I always plan sides first because sliders shine more when paired right, and time matters when guests are ready to eat; I like served plates that feel warm and good, so I match ham sliders with crisp fries, crunchy potato wedges, or a light salad, and when I want speed I use the air fryer for a nice brown finish that people enjoy right away, while a homemade dip like marinara adds comfort and balance; on the top of the sliders, I brush butter so the tops turn brown, add cheese until melted, and sprinkle Parmesan and Parmesan cheese for flavor, then I round the plate with roasted veggie sides so every bite feels planned, relaxed, and easy to love.
How Many Sliders to Make for a Crowd
From my catering time at family game nights, I plan portions by watching how people eat and what sides are served, so for a crowd I count on small sliders that are easy to grab, with cheese fully melted, lightly brown tops, and a nice crunch on top when brushed right; I usually finish with Parmesan and Parmesan cheese for flavor, then set them out with a warm dip like marinara, which helps guests enjoy every bite, and to keep things good and flexible I pair them with salad, homemade fries, potato wedges, or a roasted veggie, and when I need speed I reheat a batch in the air fryer so the tops stay crisp and the crowd stays happy without slowing the flow.
Make-Ahead and Storage Tips from Experience
From years of experience, I’ve learned that smart prepping is what saves you stress when hosting a Holiday party or casual get-together; a solid recipe planned ahead of time allows better preparation, smarter timing, and longer freshness, especially when you follow reliable make-ahead and storage tips that protect texture and control moisture without changing flavor.
Smart Make-Ahead Strategy for Sliders
When I suggest making sliders early, I always warn against waiting too long to finish them; from my routine, I lightly brush the tops with a warm butter mixture right before baking to ensure the sliders don’t get soggy, because managing moisture at the final step is the key to keeping the best texture and freshness while still enjoying the ease of true make-ahead preparation.
Keeping Sliders Fresh Before the Party Starts
From my experience, smart prepping starts with the recipe and clear timing, especially for a Holiday party or casual get-together, so I always suggest working ahead of time to reduce waiting stress; during preparation, I brush the sliders with a light butter mixture right before baking to ensure the sliders don’t get soggy, which protects texture and balances moisture, and for make-ahead success I rely on simple storage tips that lock in freshness—cool fully, wrap tight, and rewarm gently—because handling before the oven is just as important as what happens inside it.
Cooking Italian Sliders Using Different Methods
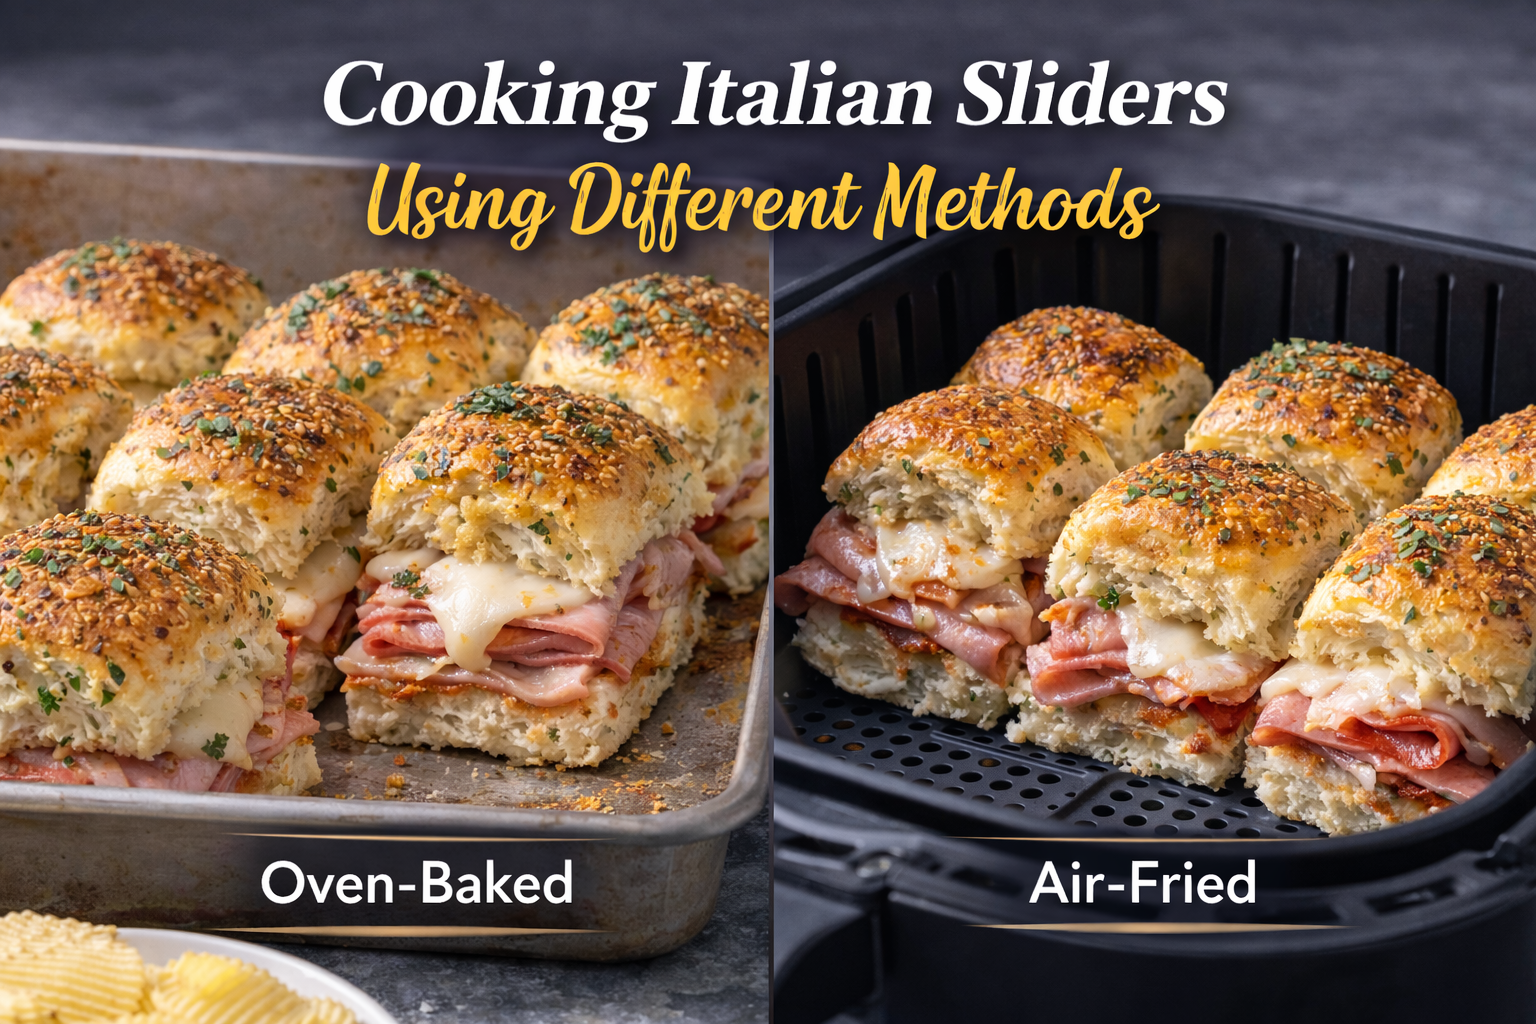
Starting with the in airfryer approach, I’ve found this method perfect when I want fast results with less mess, especially when making Italian sliders for a hungry crowd; the heat stays even, the bread turns crisp, and the cheese melts just right without drying the filling. Over time, I learned that switching between methods like oven baking or pan heating keeps things flexible, which is why I enjoy testing easy slider recipes depending on time and tools. No matter the method, the focus stays on balance—soft bread, bold flavor, and smooth timing—so the process feels relaxed and reliable, even when cooking for many people at once.
Oven-Baked vs Air Fryer Sliders: Expert Tips
Starting with the air fryer makes sense because making Italian sliders in airfryer saves time and keeps the bread crisp while the cheese melts evenly, and from my own kitchen tests, this method works great for weeknights when you want easy slider recipes without heating the whole oven; I usually preheat for even airflow, place the sliders close but not touching, and cook until the tops are golden, then I compare this with oven-baked sliders, which are better when cooking for a crowd since they handle larger trays well and give a softer inside with a lightly toasted crust, so switching between these two methods depends on speed versus volume, and I often shuffle ingredients the same way for both to keep flavors consistent while adjusting only the cooking time and heat for best results.
Creative Italian Slider Flavor Ideas
Starting from the heart of Italian street food, I’ve found that sliders shine when you balance tradition with playful twists, and that’s where flavors like little a salami, ham and banana, and a sharp provolone wedge come in. In my own kitchen experiments, mixing salty cured meats with unexpected sweetness created sliders that feel familiar yet exciting, while creamy cheese ties everything together. By layering textures and aromas carefully, these Italian-inspired sliders become more than mini sandwiches—they turn into bold bites that surprise guests and still respect classic Italian taste roots.
Unique Ingredient Combos You Didn’t Expect
When I test new sliders in my kitchen, I start by breaking habits, and that’s where Unique Ingredient Combos You Didn’t Expect truly shine, because Italian flavors feel fresh again when you play with contrast and balance. I once paired ** little a salami** with a soft, sweet note, and it worked because salt wakes up mild flavors, just like ham and banana surprised me by blending savory depth with gentle sweetness in one bite. To anchor these bold ideas, I always add texture, often using a provolone wedge, which melts slowly and keeps the slider rich without overpowering the filling. From my experience, these choices feel daring but still familiar, making sliders memorable while staying simple, comforting, and easy to enjoy.
Using Provolone Wedges for Texture and Taste
From my own kitchen testing sliders for family nights, I found that starting with cheese changes everything, and this approach fits perfectly with Italian-style creativity. A sharp provolone wedge adds a firm bite that melts just enough, giving contrast to soft buns and rich fillings, especially when paired with little a salami sliced thin for balance. I once tried an unexpected mix with ham and banana, and the mild sweetness worked surprisingly well against the salty notes, making each slider feel playful yet grounded. This method keeps flavors clear, textures layered, and the overall slider experience memorable without feeling heavy or overdone.
Italian Slider Recipes Inspired by Classics
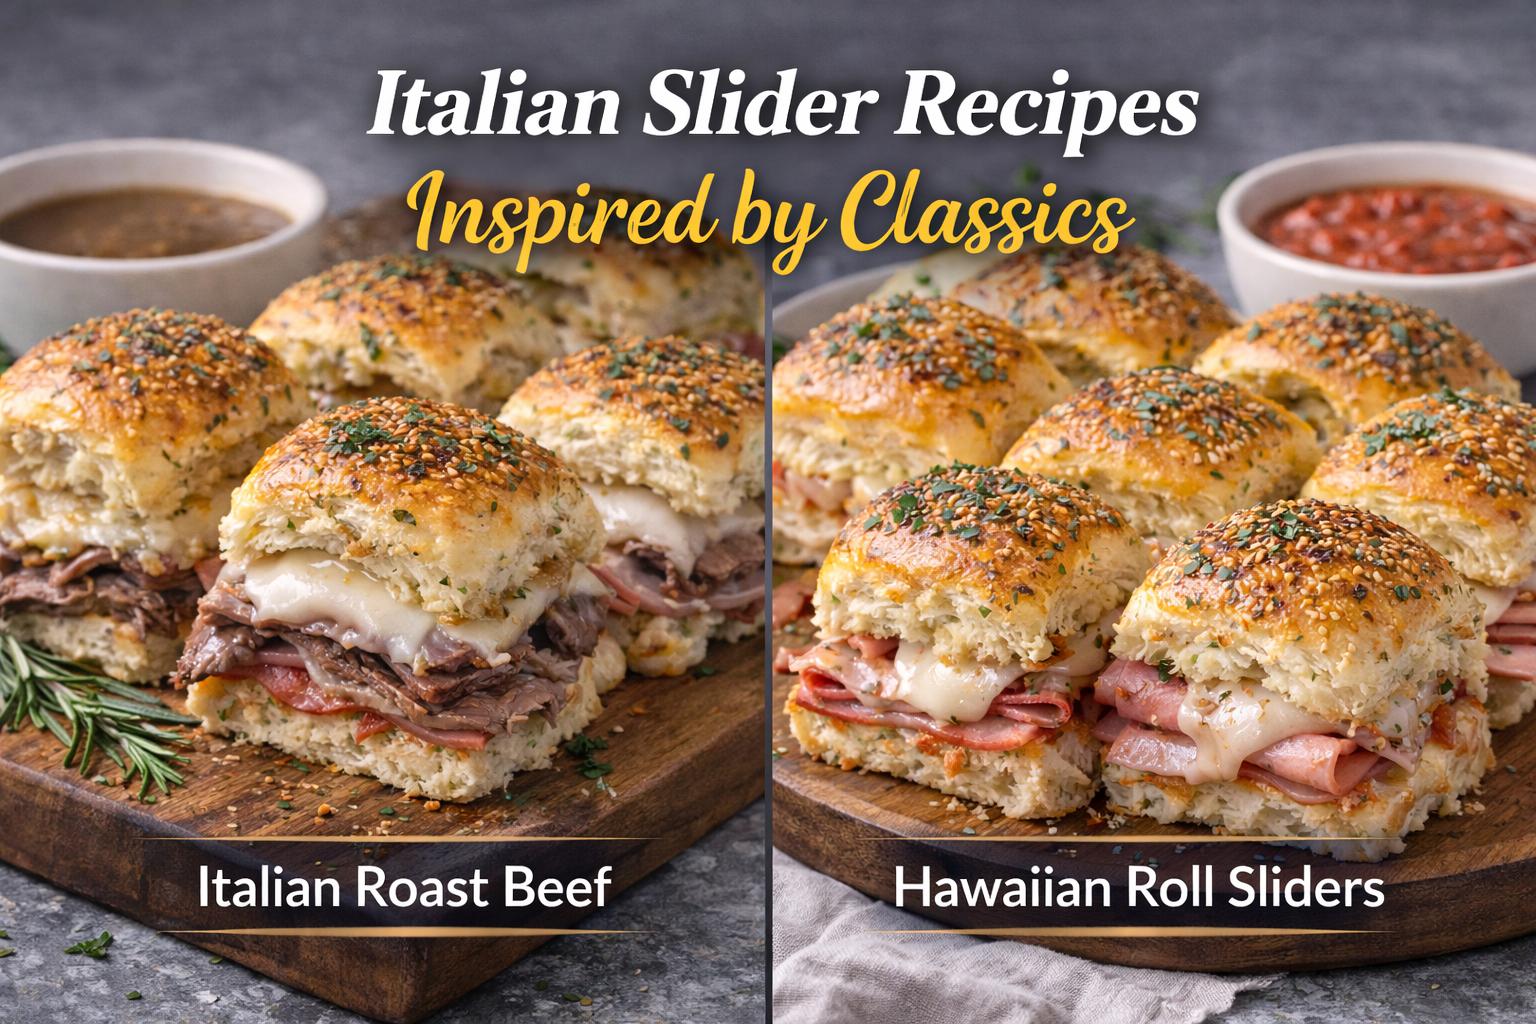
When I first started experimenting with italian flavors at home, I wanted something small but bold, and that is how this recipe idea came alive. Instead of big sandwiches, I focused on a slider approach using soft hawaiian rolls, which balance rich fillings perfectly. Inspired by deli traditions, I mixed classic roast beef with herbs and cheese, while also testing party-friendly ham sliders for variety. These small bites keep the soul of Italy intact but make it easy to serve, share, and enjoy without the heaviness of a full meal, which is why I keep coming back to this style when cooking for family or friends.
Hawaiian Roll Sliders with an Italian Twist
When I first tested this recipe, I wanted comfort and bold flavor in one bite, so I leaned on soft hawaiian rolls and filled them with italian ideas I grew up cooking at home. I layer thin roast beef for depth, then balance it with herbs and a light sauce so each slider stays juicy without feeling heavy. For guests who prefer variety, I often mix in ham sliders, which bring a gentle saltiness and work beautifully with the same rolls. This approach keeps prep simple, flavors familiar, and the result feels both classic and fresh, especially when served warm straight from the oven, just like I do for family nights or quick gatherings.
Frequently Asked Questions About Italian Sliders
From my own kitchen tests, I love how pepperoni, salami, ham, slices, and cheese turn sliders into a truly Italian meat treat that feels layered, smart in layering, and used often when making a simple snack that can be easy to assemble ahead of time for a party or get-together I always recommend.
Can Italian Sliders Be Made Ahead of Time?
From my experience, I recommend making these sliders ahead of time for a party or get-together because the layered meat and cheese slices hold well without turning soggy.
I usually finish layering pepperoni, salami, and ham, then refrigerate the rolls and wait to bake.
How to Store, Bake, and Reheat Them Properly
Before baking, brush the top with a butter mixture made with simple garlic powder, Italian seasoning, red pepper flakes, and a mild spice to add gentle heat.
When ready, bake in a hot oven until warm, serve at room temperature, and reheat leftovers in an air fryer to keep them great.
What’s the Best Way to Serve Sliders at a Party?
From my own party and family get-together experience, I recommend making Italian sliders with pepperoni, salami, ham slices, layered with cheese, banana pepper rings, and pepperoncini sliced to control heat, as this easy assemble style lets you prep ahead of time without stress.
How Do You Keep sliders warm Without Drying Them Out?
I keep gentle heat by covering baking rolls with foil, brushing the top with a butter mixture, and holding them in a hot oven or at room temperature so they stay great and not soggy for a party or get-together I always recommend.
Smart Layering, Storage, and Reheating Tips
When making Italian sliders, I assemble ahead of time with pepperoni, salami, ham slices, cheese, and meat layered by clean layering, used with mild banana pepper rings or pepperoncini sliced to add flavor while adding simple seasoning like garlic powder, Italian seasoning, red pepper flakes, and spice; after you bake, avoid waiting, refrigerate leftovers, then reheat in an air fryer for an easy win.